

Welcome, Lykkers! If you're eager to explore the beauty of water in motion through your lens, you're in the right place. Water photography offers endless opportunities to create stunning and serene images.
In this guide, we’ll cover essential tips on how to capture the smooth, flowing essence of rivers, waterfalls, or ocean waves, turning them into captivating works of art.
Whether you're a beginner or an experienced photographer, these insights will help you master the techniques and equipment needed to bring out the best in your water shots.
<h3>Understanding Exposure Settings</h3>
One of the key factors to achieving that smooth, ethereal look in water photography is mastering exposure settings. These settings play a crucial role in how you capture the fluid motion of water while maintaining clarity and detail.
<h3>Shutter Speed: Creating the Flow</h3>
The duration of your exposure directly affects how the water appears in your photograph. A longer exposure time creates a soft, blurred effect, emphasizing the movement of water. To achieve this effect, experiment with various shutter speeds.
For slow-moving streams, a minimum exposure of 0.5 seconds is recommended, while faster waterfalls may require a shorter exposure time of around 0.1 seconds. These settings can vary, so be sure to test different times to find the perfect balance for your shot.
<h3>Focal Length: Influence on Water Movement</h3>
The focal length of your lens affects how much of the scene is in focus and how the movement of the water is captured. A shorter focal length will allow the water to cover a broader area, making it appear more fluid.
Conversely, using a longer focal length enables you to focus on specific sections of the water, resulting in faster shutter speeds and more controlled images. Adjusting the focal length helps refine the overall composition of the water's movement.
<h3>Optimal Lighting Conditions</h3>
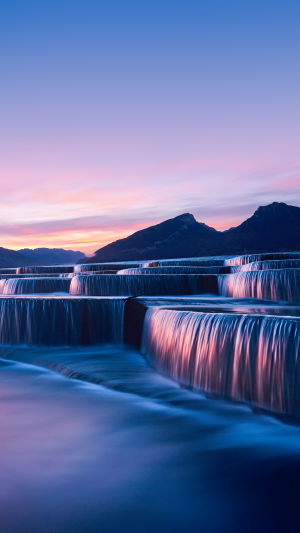
To make water’s texture stand out and to emphasize the smooth flow, it’s essential to capture the scene in soft, diffused light. The "blue hour"—the period just after sunset or before sunrise—is ideal for water photography, as the light is gentler and creates a more moody atmosphere.
Cloudy or overcast days also provide excellent lighting conditions for soft water shots, as the diffuse light reduces harsh shadows and bright reflections.
<h3>Adjusting ISO Settings</h3>
The ISO setting on your camera controls the sensitivity of the sensor to light. To avoid overly bright or washed-out photos, choose a lower ISO setting, usually between 50 and 100.
A low ISO ensures that the water appears smooth and free from noise, which is especially important when using long exposure times. Adjust your ISO accordingly based on the available light, and remember that in bright sunlight, you may need a neutral density filter to reduce light exposure even further.
<h3>Choosing the Right Equipment</h3>
The right gear is essential to creating professional-quality water shots. Here’s what you’ll need to achieve stunning soft water effects.
<b>Camera Type: DSLR or Mirrorless</b>
A digital single-lens reflex (DSLR) or mirrorless camera offers the flexibility and control required for water photography. These cameras allow you to adjust key settings manually, such as shutter speed, ISO, and focal length.
While compact digital cameras may capture motion, they lack the manual control needed for the level of precision that water photography demands. If you're serious about capturing soft, flowing water, investing in a DSLR or mirrorless camera is highly recommended.
<b>Use of Tripods for Stability</b>
When shooting with long exposure times, a tripod is essential to prevent unwanted camera shake and ensure sharp, clear images. Using a tripod will keep the camera stable throughout the exposure, allowing you to capture the flowing water without any blur from your own movements. This is especially important for photos with longer exposure settings, where even the slightest shake can distort the image.
<b>Filters for Enhancing Water Photography</b>
In some lighting conditions, especially when the sun is too bright, using filters can help achieve the desired soft water effect.
A neutral density (ND) filter is highly beneficial, as it reduces the amount of light entering the camera, enabling longer exposure times without overexposing the image. A polarizer filter is another useful tool, as it eliminates reflections from the water’s surface, helping to create clearer and more vivid photos with enhanced detail.
<h3>Perfect Timing and Location</h3>
To capture the beauty of water in motion, it's crucial to choose the right location and time for your shoot.
<b>Best Time of Day</b>
The best time to photograph water is during the "golden hour" (early morning or late afternoon), or during overcast days when the lighting is softer. This will give your photos a more serene and dreamlike quality. As mentioned, the blue hour is an excellent time to shoot, as the subdued light enhances the smoothness of the water.
<b>Where to Shoot</b>
Water photography can be done at various locations, including rivers, lakes, beaches, and waterfalls. Each type of water presents a unique challenge. For rivers and streams, focus on slower-moving sections for a gentle, flowing effect.
For waterfalls, you can achieve dramatic long-exposure shots, especially if you’re shooting from a lower angle, capturing the water cascading downward. When photographing at the beach, focus on the waves as they crash against the shore, creating dynamic water movement.
<h3>Final Thoughts</h3>
Water photography is an art that requires patience, technical knowledge, and the right equipment. By adjusting your exposure settings, using the correct camera gear, and choosing the best lighting and timing, you can capture stunning images that highlight the beauty and fluidity of water in motion.
Whether you're photographing a serene stream or the powerful rush of a waterfall, mastering the art of soft water photography will allow you to create timeless, captivating images. Happy shooting, Lykkers!


